Often times, multiple branches exist in a project and incorporate divergent changes. There is always need to combine these changes in a process that results in a (new or existing) branch that includes changes across the different branches. In the world of git, there are two primary routes you can take when combining changes: Merging and Rebasing. To the best of my ability, i shall attempt to explain how they both work.
Merging
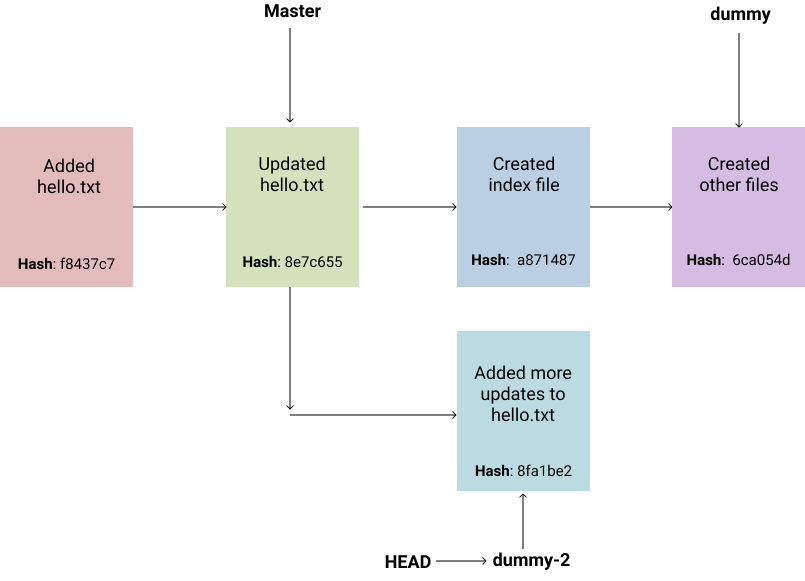
When you checkout a branch and wish to apply changes in another branch, you can use what is called a merge. git merge <branch_name>. What git does is to apply all the changes that happened on the merged branch unto the current (target) branch. Now remember from the last part on this series, the current state of our project looks like this:

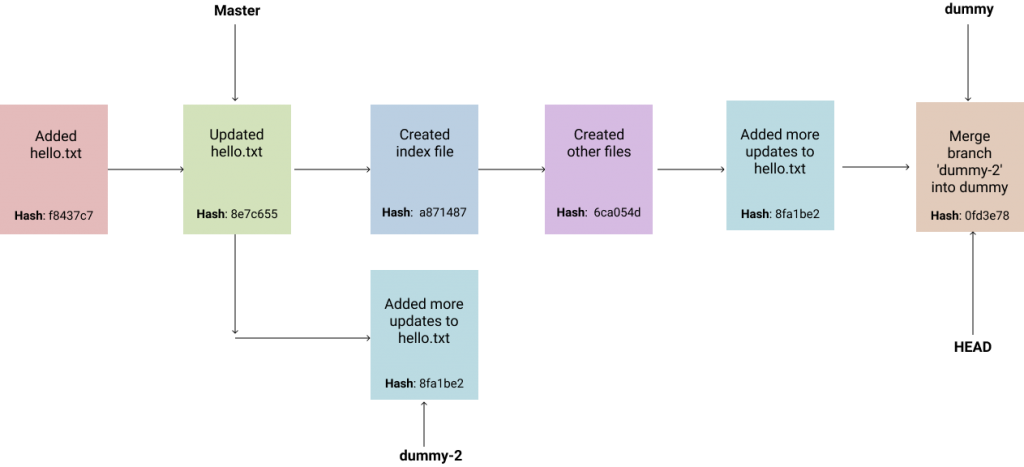
If we’re going to merge the changes on dummy-2 branch unto dummy branch, we would simply checkout dummy branch and then run command: git merge dummy-2. This command will apply the changes on dummy-2 branch not on dummy branch and create a new merge commit.
$ git checkout dummy
$ git merge dummy-2
$ git log

commit 0fd3e78a51decf94ecafc7978def6d855a4ae2f5 (HEAD -> dummy)
Merge: 6ca054d 8fa1be2
Author: Julian Dumebi Duru <durutheguru@gmail.com>
Date:   Sun Jun 14 18:37:30 2020 +0100

    Merge branch 'dummy-2' into dummy

commit 8fa1be2afbf53f62ae4cd55db9d614f3bab81d63 (dummy-2)
Author: Julian Dumebi Duru <durutheguru@gmail.com>
Date:   Mon Jun 1 00:13:36 2020 +0100

    Added more updates to hello.txt

commit 6ca054dc2c616764036733a96d9ef32b793f34c9
Author: Julian Dumebi Duru <durutheguru@gmail.com>
Date:   Sun May 31 23:51:55 2020 +0100

    Created other files

commit a8714874ab599e7225e4c9a2142302c31d0da292
Author: Julian Dumebi Duru <durutheguru@gmail.com>
Date:   Sun May 31 22:29:33 2020 +0100

    Created index file

commit 8e7c6555efa7bf3cfb7a2ad0f566a52f883d4cf0 (master)
Author: Julian Dumebi Duru <durutheguru@gmail.com>
Date:   Sun May 24 21:43:55 2020 +0100

    Updated hello.txt

commit f8437c70ec701b3e74fc586c6a088f09795bfc15
Author: Julian Dumebi Duru <durutheguru@gmail.com>
Date:   Sun May 24 21:12:09 2020 +0100

    Created hello.txt
The git log command prints all the commits in our current branch in reverse chronological order. It’s obvious from the log, changes on dummy-2 branch were applied on our current branch and a new merge commit was created.

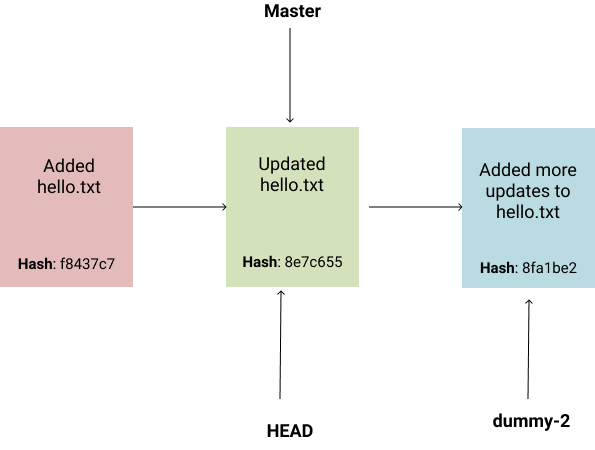
Merging can happen in different ways. In the example above, the two branches dummy and dummy-2 had disparate changes. Git merged the two branches by creating a new commit. Sometimes, this may not be the case. If the commits on the merged branch can be applied easily on the current branch because there are no divergent changes, git moves the current branch pointer to point to the merged branch’s latest commit. This is called fast-forward merging. Say we wish to merge dummy-2 branch into master, we have the following setup:

Because all the changes on dummy-2 branch are linearly descended from the last commit on master, git can move the master pointer to point to the latest commit on dummy-2. This is called fast-forward merging. What this does is provide an optimised merge, and also avoid creating a new merge commit. While this is okay, sometimes it’s not desirable as you may wish to have a merge commit clearly indicating when a branch was merged into another branch. To avoid fast-forward merging, simply include a --no-ff in the command, like this: git merge --no-ff dummy-2. Effectively, you have disabled fast-forward merging and git will prompt you for a commit message to include in the merge commit.
Rebasing
Asides merging, rebasing also provides an alternative means of combining changes across 2 branches. When you rebase branch b1 unto branch b2, you move b1 to begin at the tip of b2 and apply all changes in b1 as new commits on b2.
$ git checkout b1
$ git rebase b2
As opposed to merging which creates a merge commit, rebasing creates new commits for each commit in the original branch. While rebasing allows us to maintain a linear project history, it is generally considered better practise to use merging because it gives a better indication of what actually happened during the course of a project. Rebasing should only be used on branches that aren’t shared (used by other developers). for example: local branches.
Working with Remote Repositories
A remote repository is a version of your repository that is hosted outside your local repo. It could reside on your machine, or on the internet, or on another machine on a shared network.
After cloning a repository to your localhost, git automatically creates a reference to the remote repo named origin with which you can pull or push changes upstream. If however you initialised an empty git repo locally, there won’t be a remote url. You can view all registered remotes by typing following command: git remote -v.
If you wish to add a new remote reference, simply enter command: git remote add <short_name> <remote_url>. Typically, you’ll want to give your remote reference the short name: origin. The remote url would be the fully qualified url to the remote repository. This repo could be hosted anywhere: Github, Bitbucket, Gitlab, or a remote server. You of course need to log into your preferred hosting server and ensure you setup the repo. Once you setup your remote url, you can start pushing local changes to the remote repository.
$ git remote add origin https://github.com/durutheguru/newrepo.git
$ git push --all -u
The above snippet, adds a remote url to the local repository using the origin short name. Then I push all local branches to the remote repository. All my local changes are now online. Sweet!
Tagging
Git Tags allow you to mark specific points in your project history as important. For example, a tag can be used to mark your repository at a certain version based on some milestone that has been accomplished.
You can add a new tag to a project by using command: git tag v1.0 .
This creates a new, lightweight tag tied to the most recent commit on the project. You can also create an annotated tag by including the -a flag. git tag -a v1.0. This allows you add some meta-data with the tag, like author name, email etc.
Tagging makes it very easy to locate specific points in the development history. It is possible to checkout a tag and immediately have the project restored to the most recent commit at the time the tag was created. Tags are meant to be readable and self-explanatory.