As you progress through your software development journey, chances are you will grapple with projects that vary in complexity. While some projects can be hacked in a weekend, others might demand a much longer time due to considerable effort required in implementation. There’s hardly a relevant software project in existence that does not employ some form of version control. In a series of posts, i’ll discuss some basics around version control (primarily git) and commands you need to know in order to have a smooth developer workflow.
So the question is: Why do we need version control? Well, to put it simply: software development is hardly linear. If you have worked on a non-trivial project, then i’m sure you have encountered scenarios where you needed to fix issues on a live environment, experiment with a new feature, or discard work that was no longer required; while collaborating with other engineers. The general motivation behind version control is the need to track and manage changes on a project.
Common VC systems in existence include: Git, Mercurial, Subversion, CVS(Concurrent Versions System) etc. The most popular of course is Git. In fact, Git has become a basic requirement for any software developer. Its popularity stems from the fact that it is super fast and efficient.
So How does Git work?
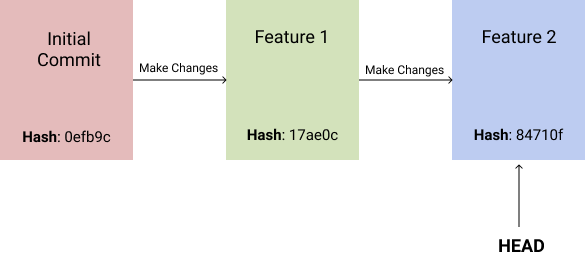
Git differs from other VCS is that it manages file changes as a sequence of snapshots. When changes are committed, Git saves a snapshot of all files in the project and stores a reference to that snapshot. In order to conserve space and be more efficient, if a file has not changed since the last commit, git stores a link to the last updated version of that file.
Files and directories are usually checksummed before they are stored. Checksumming computes a hash value using SHA-1 algorithm in order to arrive at a hexadecimal string which computationally represents the contents of the file or directory. This means that whenever there are changes, a new hash will be saved against the file or directory.
Getting Started – Installing Git
The first step before you can start playing with git is to ensure you have it installed on your local machine. The installation process will vary depending on your local operating system.
For Linux Users on a Debian based installation, you can run command:
$ sudo apt install git-allFor Mac Users (like myself), you could install XCode Developer Tools. It comes bundled with a number of command line tools that would aid your work. Or you can try this easy installer.
For Windows Users, i’d advise you use this link to download a git installer.
Once you have installed git, fire up your command line and type the following command to ascertain that git is ready to go.
$ git --versionYou should see the version of git installed on your local environment.
Configuring Git
Now that you have git installed locally, you would want to configure some basic settings. Git has 3 primary locations for storing configs:
- /etc/gitconfig: This contains configurations for all users across the system.
- ~/.gitconfig: Also called global config. This contains settings that will be applied across all your local projects.
- .git/config: This contains configurations for a local git repository. Usually this path will exist within the context of a project, and will only contain settings pertaining to that project.
So, let’s list out existing configurations:
$ git config --list

credential.helper=osxkeychain
core.excludesfile=/Users/dduru/.gitignore_global
user.name=Julian Dumebi Duru
user.email=durutheguru@gmail.com
commit.template=/Users/dduru/.stCommitMsg
credential.helper=cache --timeout 10800
As you can see, the above command outputs a bunch of key – value pairs that form git’s basic settings. You do not need to bother yourself with most of the configurations, and quite frankly you should avoid making edits you don’t need. Also, bear in mind that lower level configurations will always override higher level configurations of the same key.
You can view a specific config by typing command:
$ git config <key>The only configurations you need to edit for now are user.name and user.email. These settings identify you as an individual when you start making contributions to other projects or collaborating with other developers. To change a git configuration, type command:
$ git config <key> <value>This will only update your local config if you are within the context of a git project. To update a global configuration, you need to include the –global flag like this:
$ git config --global <key> <value>Go ahead and configure user.name, and user.email . If the configured value contains spaces, you would need to wrap in quotes. Example:
$ git config --global user.name 'Julian Dumebi Duru'
$ git config --global user.email 'durutheguru@gmail.com'
Now that you have installed and configured git, you are ready to start working on a git project and learning some of the basic commands.