Modern frontend development has really gone far. Honestly, if you can remember the early days, you know we’ve come a long way from relying on spaghetti JQuery code to deliver functionality to users. Today we have frameworks like React, Vue, and Angular. These frameworks encapsulate the MVVM and MVC software architecture patterns that make it easier to build scalable frontends to meet the demands of users.
Some of the basic requirements of a frontend include accepting input from a user and forwarding the input to the backend, also there is often the need to fetch data from the backend and render it to the user. All this might seem so simple on the surface, but as you start to build out a large system, complexity can start to increase by several orders of magnitude. Therefore, a well-designed frontend must follow best practices of componentization and clear separation of concerns.
In the spirit of componentization, a problem starts to present itself when several parts of the application need to share data. How do we ensure this data is shared in a consistent manner and that updates to this data are communicated to all interested components? This problem is generally called State Management.
The State Management problem was born out of the inherent complexity in building out large frontend systems that relied on different components that needed to share data in a consistent manner. This problem was elegantly solved at Facebook using the Flux Architecture. The popular frontend frameworks have their implementations of Flux; Vue has Vuex, React has Redux, Angular has NgRx. For some reason they all end in x, I wish I knew why.
In this post, I’ll focus on implementing Flux in VueJS, as Vue is my frontend framework of choice. React and Angular are equally good, Vue just happens to be my favorite.
So what is the Flux Architecture?
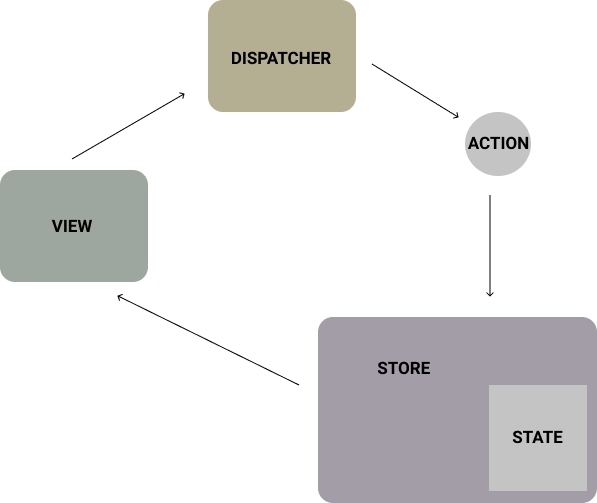
Flux introduces predictability in State Management. It accomplishes this by ensuring a unidirectional flow of data across the application. To understand Flux, let’s look at the essential components of a flux architecture:
- Actions
- Store
- Dispatcher
- Views
Very briefly, I’ll run through them.
An Action is an object that encapsulates all the information needed to perform that action. Actions are sent through the dispatcher and triggered to all listening stores. The source of the action could vary depending on the use case and specific scenario. A good example is a user triggering an action by clicking a button.
A Store is an object that serves as a wrapper around a State. The State is the source of truth; in other words, the primary source of the data we are interested in. The store accomplishes state management by exposing methods with which clients can trigger updates to the state or read the existing state. After executing an update, the store emits an event. Through event propagation, the changes cascade to all Views interested in that state.
The Dispatcher is responsible for delivering actions to the stores. Put simply, Stores register to listen to actions and receive notifications of actions from the Dispatcher.
And finally, Views listen for events emanating from store changes and re-render on such event notifications. Views can also be used to trigger actions to the store through the Dispatcher.
With an understanding of what I’ve just described, it is easy to see the unidirectionality of data propagation and how it reduces the complexity of state management. The Flux architecture is strict in its implementation. Clients are not allowed to directly manipulate the state; all updates pass through the store. Also, multiple components can register to listen to store updates.
Now let’s look at an example implementation in Vue. We will write a small app that will call a backend and save the data in the local store. Also, we will expose a view to this data.
Setting up a mock backend using JSON Server.
json-server is a fantastic npm module that allows you to easily mock a REST API. It’s great for frontend development because you can proceed with work and testing without waiting for an existing backend service.
To install json-server, run the command below, assuming you already have npm setup:
$ npm install -g json-serverThen create a json file to model the mock database. Here’s a sample structure:
{
  "person": [
    {
      "id": 1,
      "name": "Lagbaja",
      "occupation": "Musician"
    },
    {
      "id": 2,
      "name": "Kate Henshaw",
      "occupation": "Actress"
    },
    {
      "id": 3,
      "name": "Julian Dumebi Duru",
      "occupation": "Software guy"
    }
  ],
  "country": [
    {
      "id": 1,
      "name": "Nigeria",
      "code": "NG"
    },
    {
      "id": 2,
      "name": "Ghana",
      "code": "GH"
    }
  ]
}
Save the file content in a local folder and run command to execute:
$ json-server --watch db.jsonThe json-server module will fire up a mock server on a local port (usually 3000) and expose appropriate REST endpoints for the entities in our json file. You should have traditional REST-style endpoints available: GET http://localhost:3000/person, GET http://localhost:3000/person/1. Even POST methods are supported. You can check the official npm page for json-server.
Now that we have a mock backend, let’s setup a Vue project to implement Flux.
Scaffolding a Vue Project
Before you can go ahead with scaffolding a Vue project, you need to have vue-cli installed locally. Installation is pretty straightforward. Simply enter:
$ npm install -g vue-cliThen we can go ahead and enter the command below. I like using webpack as my module bundler; browserify is another option. You can make time to check them out. Still on your command line, navigate to a folder of your choice, and enter:
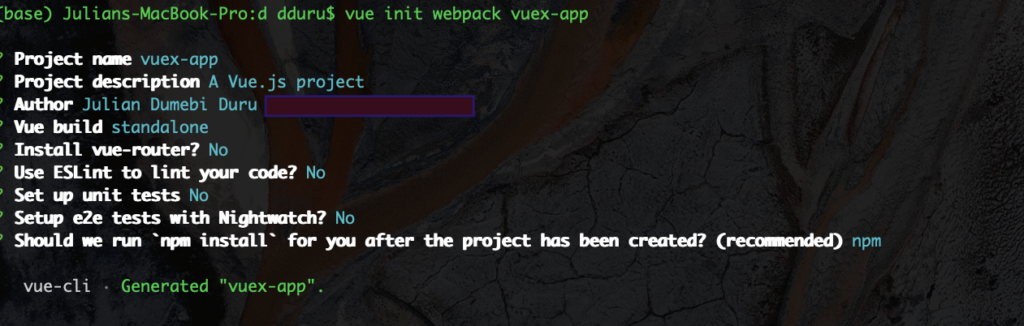
$ vue init webpack vuex-appvuex-app is the name of our sample Vue application. Feel free to replace it with whatever you deem fit. After executing the command above, you will be asked a series of jamb questions to aid the scaffolding. Select some sensible defaults similar to what I have below:
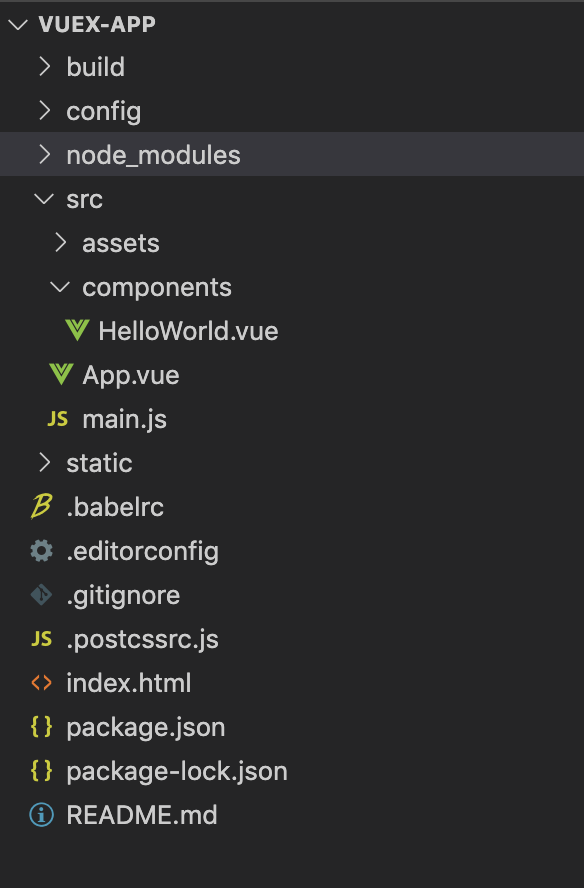
You should have a project folder that looks like this:
Within the vuex-app project folder, we need to install some node packages that will serve as dependencies for the project. The first is Vuex.
$ npm install vuex --saveTo allow us to make API calls to our backend, we’ll use Axios. I like Axios because it’s neat and it works pretty well. Plus it is backed by a large number of developers, so it’s safe to assume continued support for the foreseeable future. Here you go:
$ npm install axios --saveNow that we’ve setup our dependencies, let’s go ahead and write some code.
First, we’ll build out the store. When implementing flux, I like to employ a modular approach. It’s good to pay attention to modularisation early in development. It makes it easier to scale the codebase as you progress. So in the src folder, We will create a store sub-folder. Try to replicate the structure below:
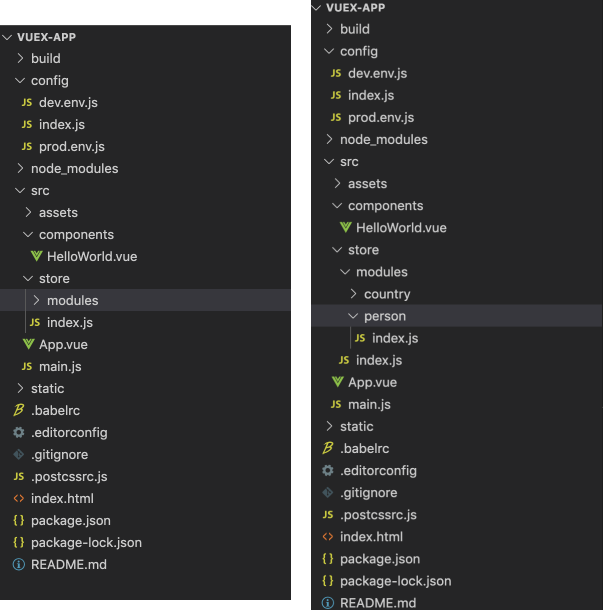
Notice how I have my modules in separate folders, each with an index.js. I try to have a separate module per API resource. It doesn’t have to be like this, you can employ whatever naming or structure you like as this just happens to be a personal preference. Moving on, in the src/store/modules/person/index.js, include the following content:
import axios from 'axios'

const state = {
    loading: false,
    error: '',
    list: []
};

const getters = {
    getPersons(context) {
        return context.list;
    },
};

const mutations = {

    setPersons(context, persons) {
        context.list = persons;
    },

    setError(context, error) {
        context.error = error;
    },

    setLoading(context, loading) {
        context.loading = loading;
    },

};


const actions = {

    fetchPersons(context) {
        context.commit('setLoading', true);

        axios
        .get('http://localhost:3000/person')
        .then(
            (response) => {
                context.commit('setLoading', false);
                context.commit('setPersons', response.data);
            }
        ).catch(
            (error) => {
                context.commit('setLoading', false);
                context.commit('setError', error);
            }
        );
    }

};


export default {
    namespaced: true,
    state,
    getters,
    actions,
    mutations,
};
The file consists of 4 different objects: state, getters, mutations, and actions.
The state object must be a Plain Javascript Object, preferably an object literal. Here’s a description of the properties in my state object:
- loading: a boolean that will allow me to track if a resource is currently being loaded.
- error: a string value to hold a possible error message from the backend.
- list: a list to hold the person objects I fetch from the API.
The getters object declares one method: getPersons which accepts a context parameter. The context is a reference to our store from which we return the person list to our caller.
The mutations object allows us to expose methods for updating our store’s state. Each method accepts the store context and a parameter to update the underlying state.
The actions object contains only one action. Our action calls the endpoint on our mock server to load person objects. Notice how I only mutate the store’s state by calling the commit method on the store. For the sake of demonstration, I have kept the code simple. In a real project, you want to avoid hard coding your base URLs. Instead, have it referenced via a configuration. That way you can easily configure your base URLs to have your app work in different environments.
Finally, we export the store module with these objects and include the namespaced property with value ‘true’. Including this flag allows us to access our person store module in a namespace (as we will see later). This promotes the reusability of our store modules by allowing them to be more self-contained.
Next, we code our store’s entry file. We will code this file to aggregate all the other store modules.
import Vue from 'vue'
import Vuex from 'vuex'
import persons from './modules/person'


Vue.use(Vuex);

export default new Vuex.Store({

  modules : {
    persons,
  },

});
Not much going on here. In line 6, we call Vue.use to install Vuex. And then we export a store object that aggregates all our modules. For now, we have just one module: persons.
With the store in place, we can now re-implement the HelloWorld.vue component to use the store we just built. We want to load a list of persons from our backend and display them on the user interface. Delete the autogenerated content of HelloWorld.vue and include this:
<template>
    <div class="">
        <div v-for="p in persons" v-bind:key="p.id">
            {{p.name}} - {{p.occupation}}
        </div>
    </div>
</template>

<script>

    import store from '@/store'

    export default {

        mounted() {
            store.dispatch("persons/fetchPersons");
        },

        computed:  {

            persons() {
                return store.getters['persons/getPersons'];
            }

        }

    }

</script>
In the template, ee use Vue’s v-for syntax to render all items in our store’s person list. Also, in the exported component, we trigger the namespaced fetchPersons action in the mounted lifecycle hook. You can checkout Vue’s official documentation to understand component lifecycles. This ensures that when the component is loaded, the fetchPersons action is triggered. Also, we expose a computed property called persons on which our v-for template binds and renders the list items. The computed property calls the store’s getter which returns the fetched person objects. Notice we have to employ the appropriate namespace to access the getter.
And we’re good to go. From the root of the project on the command line, we can run the app in dev mode:
$ npm run devOpen the app in your browser, you should be able to see the person objects in db.json which were successfully fetched and stored.

Depending on your requirements, you might want to have a store that is persisted to the local storage. This can allow us to create a somewhat offline experience for the user. In a case where the user loses internet connection, we can simply render the last successfully loaded data from the store pending when the internet connection is re-established.
If you would like your store to be persisted to the browser’s local storage, there’s a plugin you can use for that: vuex-persistedstate. Within the project root folder, run command:
$ npm install vuex-persistedstate --save Then we will make a slight modification to our store’s index file. Here’s what it should look like afterward:
import Vue from 'vue'
import Vuex from 'vuex'
import persistedState from 'vuex-persistedstate'
import persons from './modules/person'


Vue.use(Vuex);

export default new Vuex.Store({

  modules : {
    persons,
  },

  plugins: [
    persistedState(),
  ],

});
We haven’t done much here, merely imported the vuex-persistedstate and installed it as a store plugin. Pretty neat! The plugin will handle persistence to the browser’s local storage.
You can go ahead and test the setup. Refresh the page and check the browser’s local storage, you should see the loaded objects have been persisted. What’s really great is, even if we kill the mock backend and it becomes unavailable, we can still give the user an offline experience. Since our component is reading from the store which already has persisted objects. Soon as our backend is up and we can fetch new data, our store is updated and the view re-rendered. That my friend, is the magic of Flux.
Wrapping up
To recap, we implemented the Flux Architecture using VueJS.
- We setup a mock back-end using json-server
- Then we built a store to epitomize our application state.
- Then we added an Action to fetch data from the mock backend.
- Afterward, we implemented a View to trigger the Action when the View is loaded.
- The Action resulted in a mutation of the Store’s state.
- The mutations triggered events that cascaded updates to the View.
I will point out though, you don’t always need to use the flux architecture pattern. Sometimes, it’s fine to have components manage their state locally as opposed to having global State Management. Flux really shines when you need to share state across components and want to ensure a clean architecture. Though it introduces some complexity, it can be worth the trade-off. Check out this medium post by the author of Redux: Dan Abramov.
Further Reading
Vuex – https://vuex.vuejs.org/
Vue Official Documentation – https://vuejs.org/v2/guide/
json-server – https://www.npmjs.com/package/json-server
vue-persistedstate – https://www.npmjs.com/package/vuex-persistedstate